Using file synchronization and file replication for data distribution and remote online backup
Zack Baani and A. El Haddi
EnduraData, Inc.
elhaddi@ieee.org
zak@enduradata.com
https://www.enduradata.com
Abstract
EnduraData's EDpCloud is a cross-platform file synchronization and replication solution
for large scale data distribution and online backup. This tutorial explains how to configure and manage
EnduraData's Wide Area Data Distribution Solution to synchronize data between local and remote sites or
to send large or small files automatically between different sites and different operating systems.
Supported operating systems include MAC, Windows, Linux and UNIX.
This paper is obsolete. Please go to the new file sync and file replication papers.
1. Introduction to file synchronization and replication using EDpCloud
EnduraData Wide Area Data Distribution public and private cloud Software (EDpCloud) is a solution that is used to distribute and synchronize data from one site
to many remote sites and from many remote sites to a single site. The software keeps data synchronized automatically between sites.
The software is available for Linux, Mac, Windows, Solaris, etc.
This paper is a step by step tutorial that illustrates how to install and configure EnduraData EDpCloud MFT and data replication solution. We will create a simple configuration that distributes data automatically (For remote backup, file transfer or workflow purposes) from one site to another remote site. For illustration purposes, we call the local site snow.noaa.gov (sender) and the remote site flood.noaa.gov (receiver). We could alternatively use IPs in lieu of host names. This paper is intended to be a cookbook. Please refer to the software documentation for detailed information. In the examples used, NOAA captures snow data on a central server called snow.noaa.gov and then distributes data automatically to a remote site called flood.noaa.gov.
In section 2, we introduce some file replication and sychronization terminology that we will use in this paper, we follow it by how to download and install the software.
We will then delve into using the user interface to apply the software license, set up authentication,
create a configuration, monitor and troubleshoot data distribution and synchronization.
2. Terminology for sending and receiving files and file changes
Let's define a few terms before we delve into a simple configuration. Additional terms and definitions can be found in the software documentation.
- Sender: A sender is a computer that sends data to a receiver. Some other vendors use the term source to mean sender.
- Receiver: A receiver is a computer that receives data from a sender. Some other vendors use the terms target or destination to mean receiver.
Both the sender and receiver have names. The names can be either hostnames or IPs.
- Link: A link is a logical way of associating a sender and one or more receivers. Each link is identified by a unique name. A link has one and only one sender. A link has one or more receivers. Some vendors use the term replication set or repset in lieu of link. EDpCloud supports multiple links and multiple receivers (see figure 15 and 16 for examples).
- Management port: A port number used to manage replication
- Receiver port: A port used to communicate between the sender and the receiver
- Management password: A password to control access to management commands
- Management host: the hostname, IP or alias of the host allowed to manage replication
- Storepath: This is the destination path or destination directory where data will be stored on the receiver
- basedir: top directory that contains EDpCloud software
The next few sections will show you how to download and configure the software. The steps should take less than
5 minutes from start to finish.
3. Downloading EnduraData File Replication and Transfer software (EDpCloud)
- You need to download the software for your platform. Visit https://www.enduradata.com and download the software for your platform.
- You also need to download a demo license
The license is free for most public educational institutions and most nonprofit organizations with very limited budgets. The software is free for all students(personal use).
A license is not required if all you want to do is to backup a personal machine to an attached device (home users only).
4. Installing Glider replication for Windows (setup format) or Mac (pkg format):
Double click on the package name and follow the directions on your screen.
Windows users: We highly recommend that you install under C:\enduradata or d:\EnduraData, etc.
In this case basedir will be c:\enduradata\edpcloud
Mac users: If you use Mac pkg, Apple forces you to install under "/Applications".
5. Installing File Replication for Linux and other Unix flavors (tar format)
Let's assume you downloaded the package for Linux and saved it in /tmp/edpcloud_LINUX_x86_v3_1_7_E.tar.gz
Use tar to extract the content of the tar file as explained below.
Starting and stopping file replication services on Windows
Programs --> EnduraData --> Right click on "start enduradata servers" and click on run as Administrator
You can do the same to stop the services.
Starting file replication services on Linux, Mac and other Unix flavors
. /usr/local/enduradata/edpcloud/bin/edpcloud.sh start
Linux and System 5 users can issue the following command to restart services automatically after a reboot:
$ED_BASE_DIR/bin/autostart/sys5debian_autostart
Mac users can issue the following command to automatically restart services after reboot:
$ED_BASE_DIR/bin/autostart/mac_autostart
Windows users don't need to worry about this part since the installer configures the services to start automatically after a reboot
To stop replication services under Linux/Mac/Unix
Issue the command edpcloud.sh stop
This command is under $ED_BASE_DIR/bin
To stop data replication services under Windows
Issue the command edstop
This command is under %ED_BASE_DIR%\bin
You can also use Windows menus as shown below:
Programs --> EnduraData --> Stop services
6. EDpCloud Managed File Transfer and replication user interface
Starting the configuration user interface on Linux, Mac and other UNIX like operating systems:
To start the configuration UI under all UNIX like operating systems:
. /usr/local/enduradata/edpcloud/bin/enduradata_env
You can add the previous environment file to your /etc/profile or ~/.profile to setup the environment automatically.
. /usr/local/enduradata/edpcloud/bin/edconfig
Starting data replication configuration on Windows (or Mac if you used pkg installation):
Windows Double click the configuration UI short cut on your desktop
Mac Double click configuration short cut in your Applications
Figure 1 shows a screen with various panels. For discussion's sake, we name these panels P1 through P5.
We explain the content of each panel in sections 6.1 through 6.5. Figure 1 shows the necessary steps
to create a configuration.

Figure 1: EDpCloud MFT and file replication configuration user interface.
6.1 (P1): Action panel
This panel allows you to perform the following tasks:
- Create a new data distribution and synchronization configuration
- Save the configuration to a local disk
- Load an existing configuration from a local disk
- Add a new host, to be used in an existing or new configuration
- Edit a host: this allows you to change parameters for a host
- Create a new link
- Edit an existing link
- Apply a configuration: This will apply the current configuration to one or more selected hosts (if you are authorized to do so; see authentication)
- Start data distribution or remote online backup on demand
- Pause data distribution/backup for a link
- Resume paused data distribution for a link
- Examine logs for various services, this gives you access to error, status and history logs
- Start services
- Stop services
6.2 (P2): Tab panel
The tab panel allows you to perform the following activities:
- Create/Edit and modify a configuration
- Start data distribution or backup on demand
- Get information and statistics about current and previous replication jobs
- Create a replication schedule to automate file synchronization job creation
- Apply the demo or purchased license to activate the software
- Setup authentication for managing replication
- Read software documentation
6.3 (P3): Network Panel
This panel shows the list of all links and hosts that constitute the data distribution network. You can expand and shrink
the list of hosts, select a host to manage and right click to pause or resume replication.
6.4 (P4): Main Panel
This panel works in conjunction with the tab panel (P2). For example, if you are in the configuration mode,
you will see a map of the data distribution network. If you are in the schedule tab, you will see a
menu that allows you to create a schedule. We will cover these in detail in subsequent sections.
6.5 (P5): Log Panel
This menu contains logging activities from all operations. Use this to examine server logs, history, etc.
This is valuable for troubleshooting too, but more details can be obtained only by examining log files
under c:\enduradata\edpcloud\logs under Windows or $ED_BASE_DIR/logs under other platforms.
Mac users: if you used pkg installer, then your logs will be under /Library/Logs/enduadata.
7. Applying EDpCloud MFT and replication license
EnduraData EDpCloud MFT and replication needs a license. Download this license from enduradata.com or get the license token from your vendor.
In the tab panel, click "license key" and choose whether you are running EDpCloud (enterprise) or glider (personal). Figure 2 illustrates how to apply a software license for EDpCloud.
- If you are running glider personal version, copy and paste the license token and hit Apply .
- If you are running EDpCloud enterprise version, select the license file name that you have received and hit Apply .

Figure 2: Applying Glider and EDpCloud software license.
8. File replication authentication
File replication authentication is used to restrict access to data distribution and management.
Figure 3 shows a panel that lets you specify which hosts are allowed to manage replication.
Authorization uses both a list of hosts and a password.
- Hosts: A list of hosts that are authorized to send data. Multiple hosts are separated using "|".
- A password
Examples
To allow the host 192.168.100.12 or 192.168.100.14 and every machine from nasa.gov to manage
the data distribution network if they supply the correct password, we use the following entries:
Host(s): 192.168.100.12|192.168.100.14|*.nasa.gov
Password:Snow5MarsData4u
To allow every machine to manage the data distribution network if they supply the correct password:
Host(s): *
Password:OurSecretPasswordGoesHere
This entry is useful if your IP is dynamic.
WARNING
- Entering the wild card "*" for a password, will allow every host in the list to manage replication.
- Entering the wild card "*" for hosts, will allow everyone on the network to manage replication.
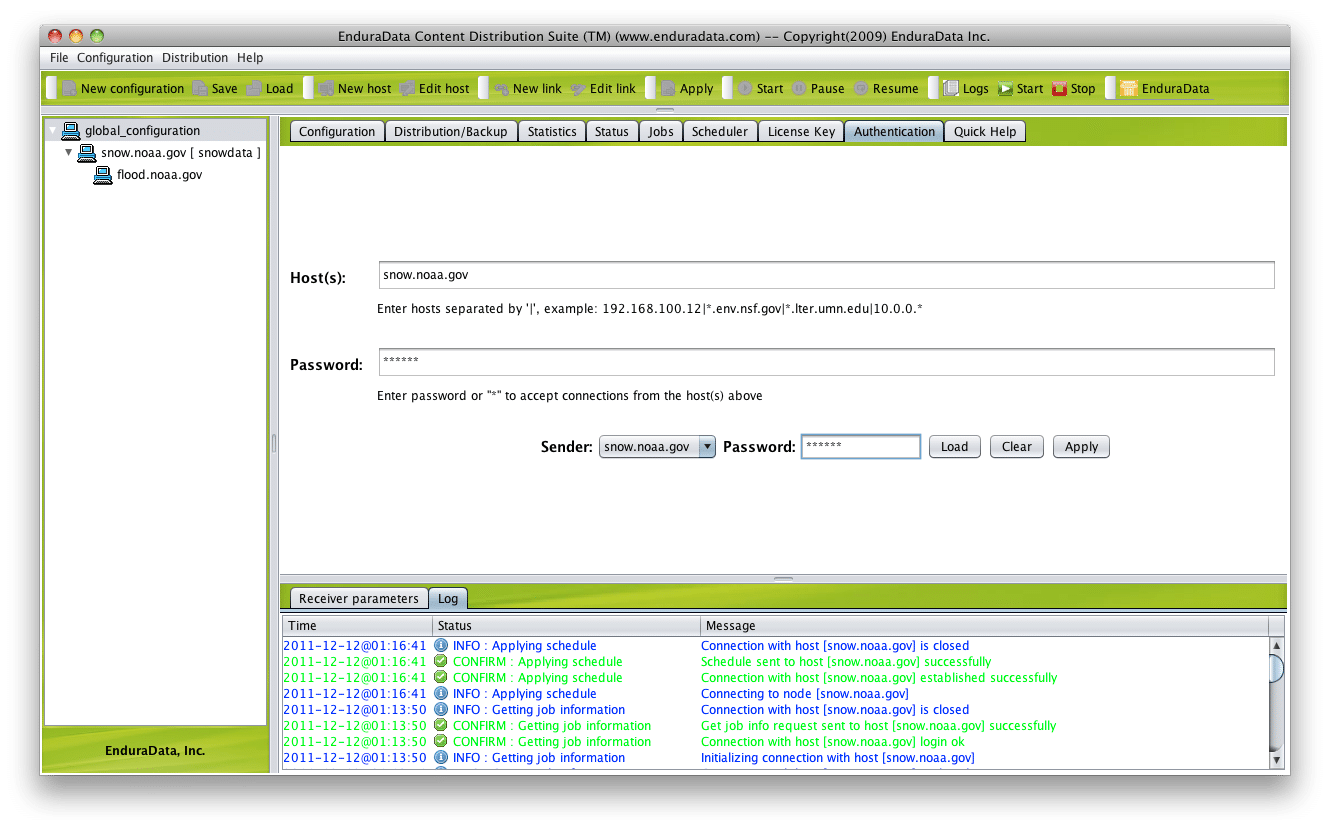
Figure 3: File replication and data distribution management authentication.
9. Creating a new configuration to replicate and distribute data
To create a new configuration we need to follow steps 1 through 4 as indicated in figure 1.
In the action panel (P1):
- Step 1: Create a new configuration: Click on "New Configuration" to start.
- Step 2: add a replication host by clicking on "New host" and fill in the host name or IP (figure 4).
Repeat step 2 to add as many receiver and sender hosts as you will need. Make sure that these hosts
are reachable before you use them. You can use ping to test connectivity between all hosts and between all hosts and the management station.
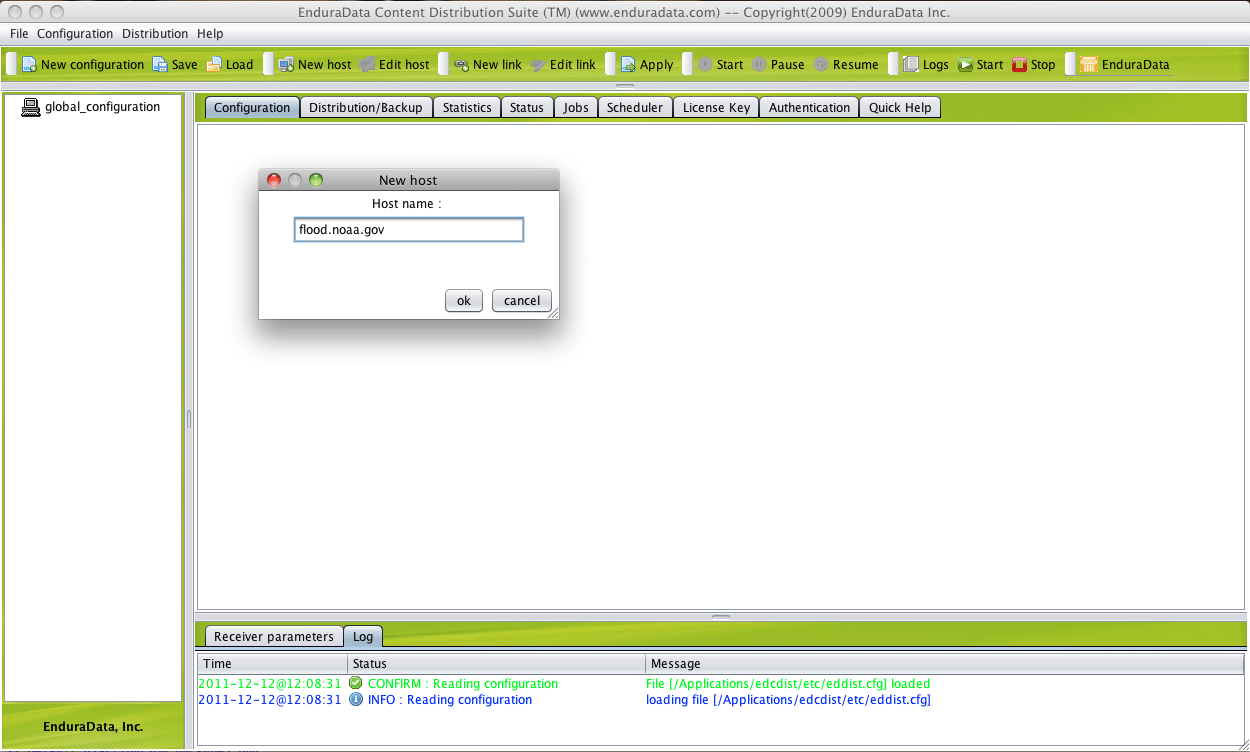
Figure 4: Adding hosts (senders or receivers).
- Step 3: Create a new link by clicking on "New Link".
Figure 5 shows a popup window where you need to enter the sender and receiver parameters.
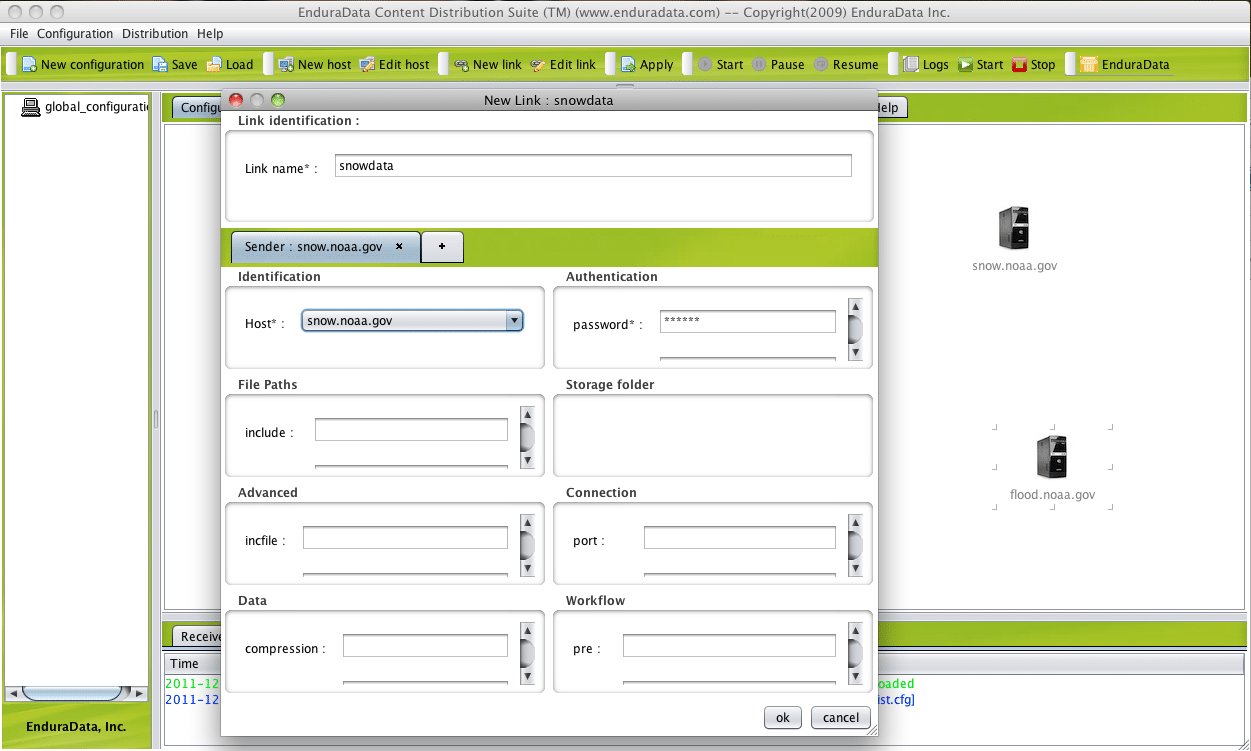
Figure 5: Edit or Create a new Link parameters.
In the "New link popup window" you will need to:
a. Enter the link name (Use alphanumeric characters only)
b. Select the data sender to use from list
c. Fill in the required parameters for the sender (these are indicated by a "*"; the rest of the non-starred parameters are optional)
d. Add a receiver by clicking on the "+" tab, select the receiver you want to use and fill in the required parameters. Please make sure that the password for the sender is the same for both the sender and receiver within the same link (Figure 6).
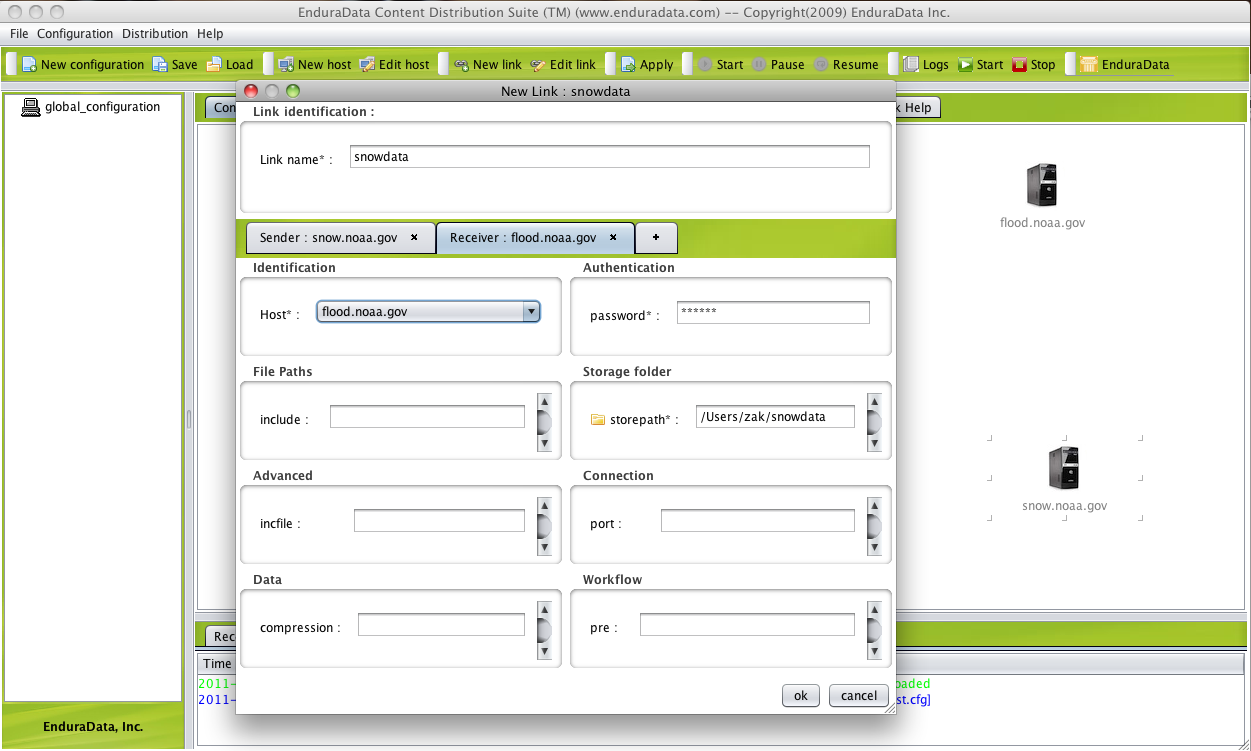
Figure 6: Editing receiver parameters in a new or existing replication link.
e. Repeat step (d) above to add other receivers if you want to configure one to many replication
f. Click "ok" at the bottom of the "New link" panel
Now you should see the relationship between the sender and the receiver (figure 7). You can adjust the positions of the
text and the icons that represent the sender, receiver in the configuration panel, to suit your preferences.
- Step 4: apply the configuration by clicking "Apply" in the action panel (P1). The configuration will not take effect until you apply it.
Once you click apply (see step 4 in figure 1), you will be prompted to select the hosts that will receive the configuration. Examine the log for errors. If you see any errors in the log panel, you will need to examine the troubleshooting section.
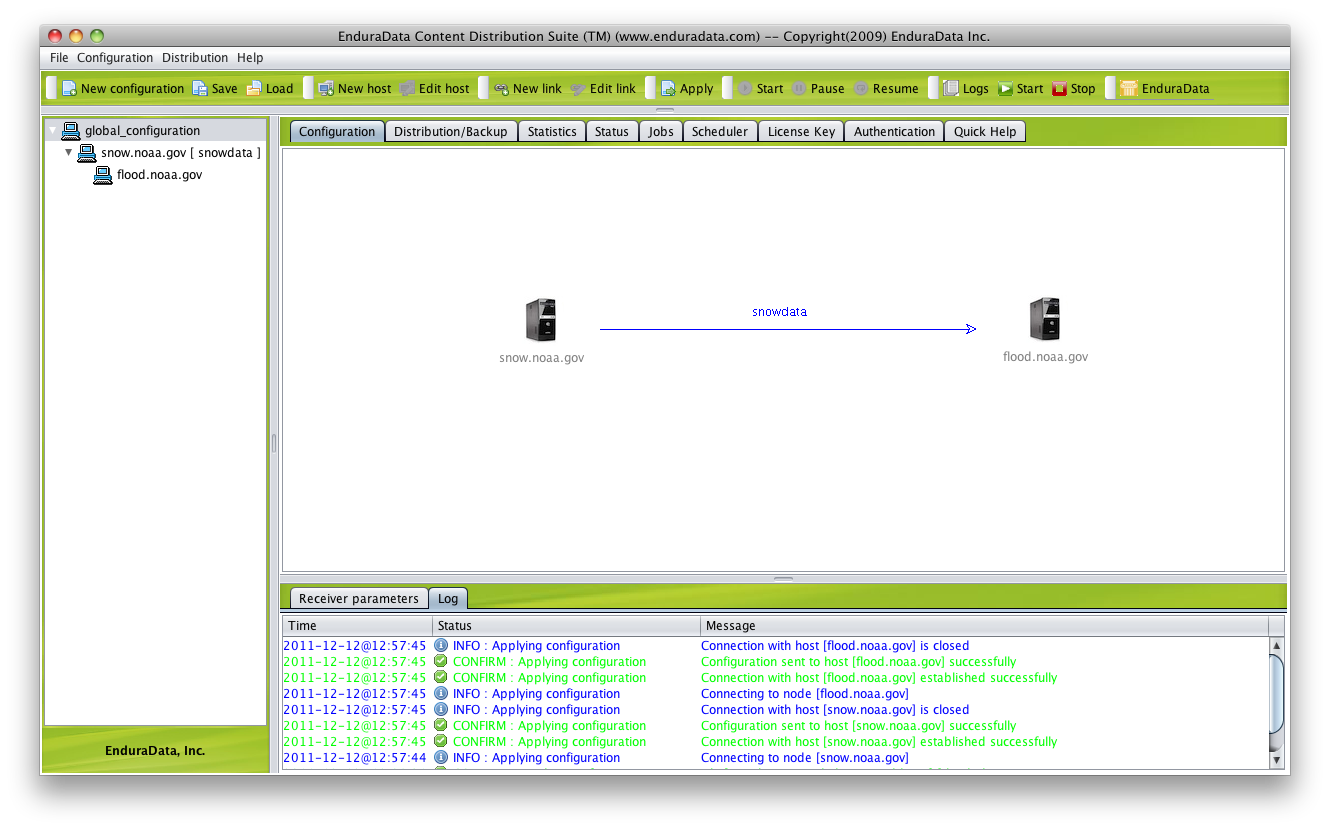
Figure 7: Example of a graphical representation of an online server remote backup and replication configuration.
You can edit any link by double clicking on the link name or by right clicking on it.
10. On Demand data distribution
a. Select a host or the entire network (network panel (P3)).
b. Click on the "Distribution/Backup" tab.
c. Enter the source path of the file or directory that you want to distribute.
You can either type the full path name in the path field or use the browse button to select it from the file system. Figure 8 shows that there are three source path fields labeled CONFIG, LINK and RECEIVER.
- CONFIG Source Path: this path is used by all links and receivers in the configuration ( Every receiver in every link will receive the data if you fill this path and start data distribution from this level. ).
- LINK Source Path: this path will be used by the specified link and all its receivers.
- RECEIVER Source Path: this path will be used only by the selected the receiver.
Once you enter the path, you need to click on the start icon.

Figure 8: On Demand Data distribution and remote backup.
11. Monitoring data distribution status and statistics
When you click on the statistics or status tab, you will see the network bar as shown on Figures 9 and 10. First select a link from the dropdown list labeled link. Then select a receiver by clicking on the dropdown list labeled receiver.
The status shows the link status (Running, Paused), the number of files in the journal, where data is stored,
the number of work items in the journal, the number of files with failures and the number of files with no failures.
These are only a snapshot in time. The statistics show the average and cumulative transfer rates.
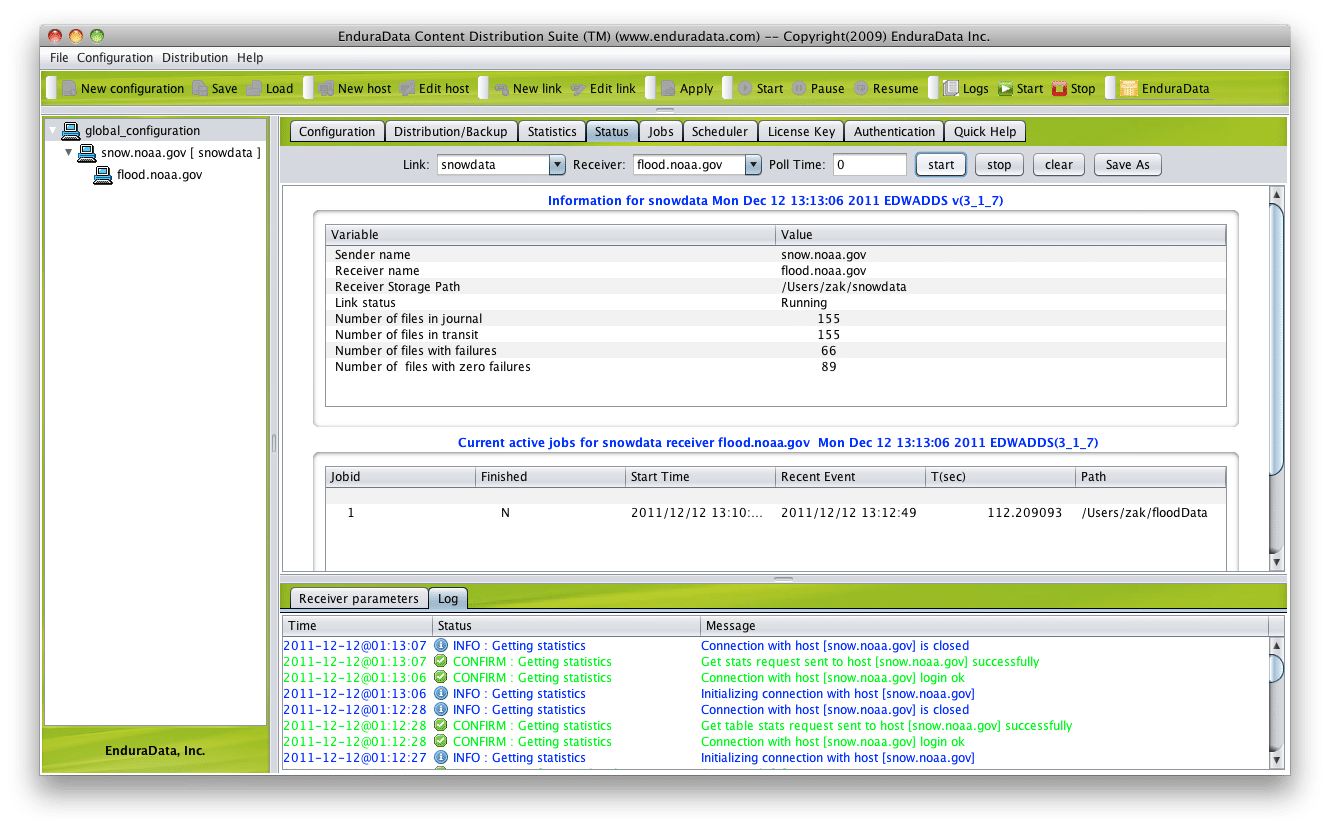
Figure 9: Data distribution status
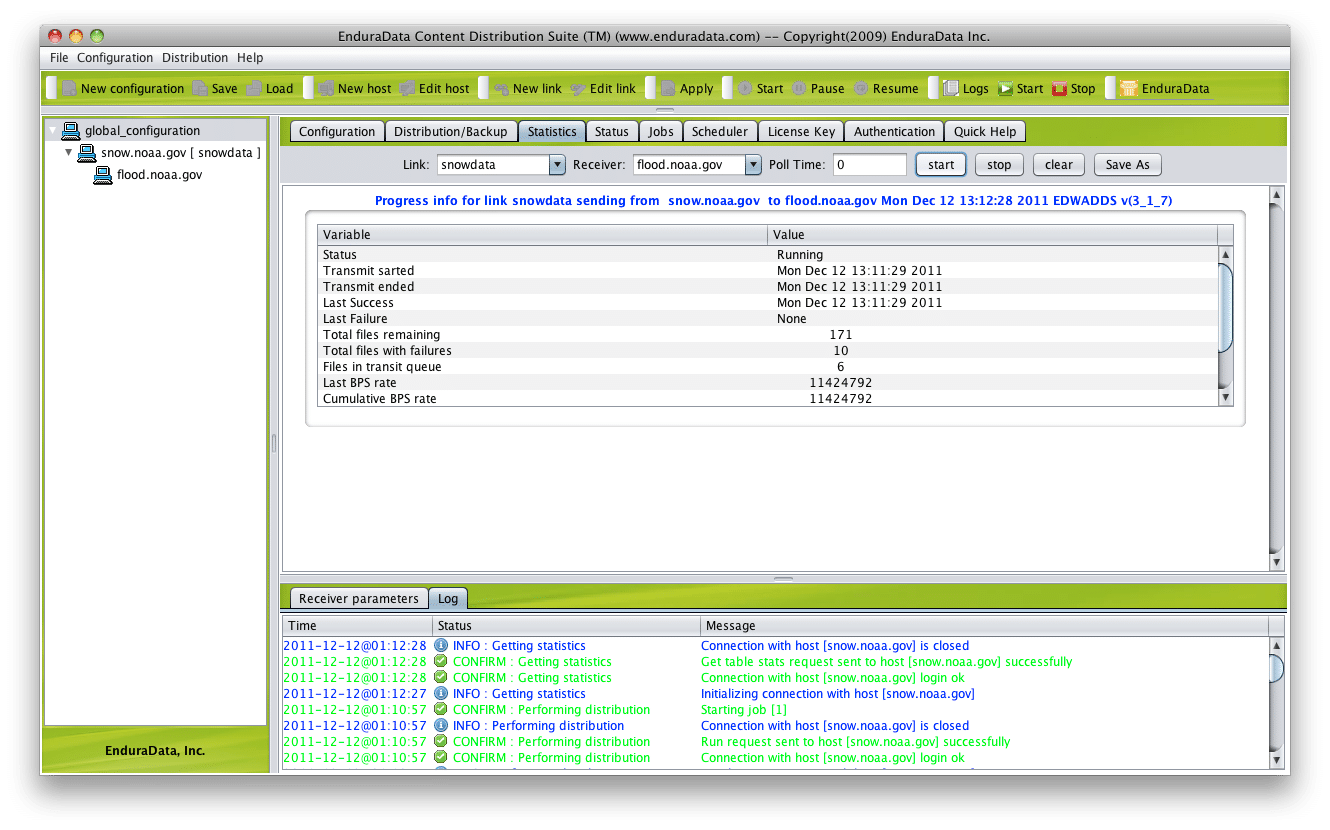
Figure 10: Data distribution statistics
12. Managing file replication and file synchronization jobs
Figure 11 shows a list of file replication and synchronization jobs, their parameters and stati. You can manage these file synchronization jobs by selecting a job row
and right clicking on it (see figure 12).
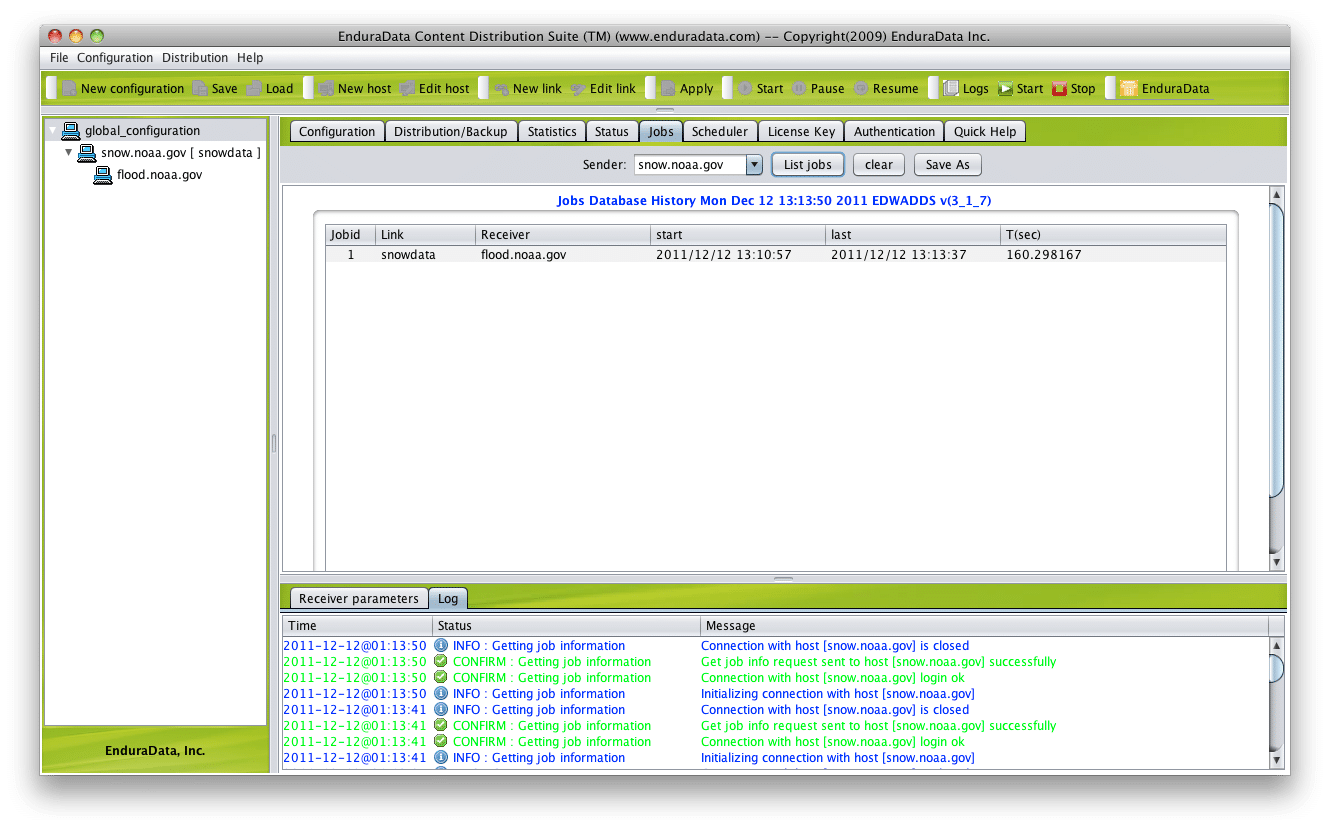
Figure 11: File synchornization and File replication jobs stati and history.
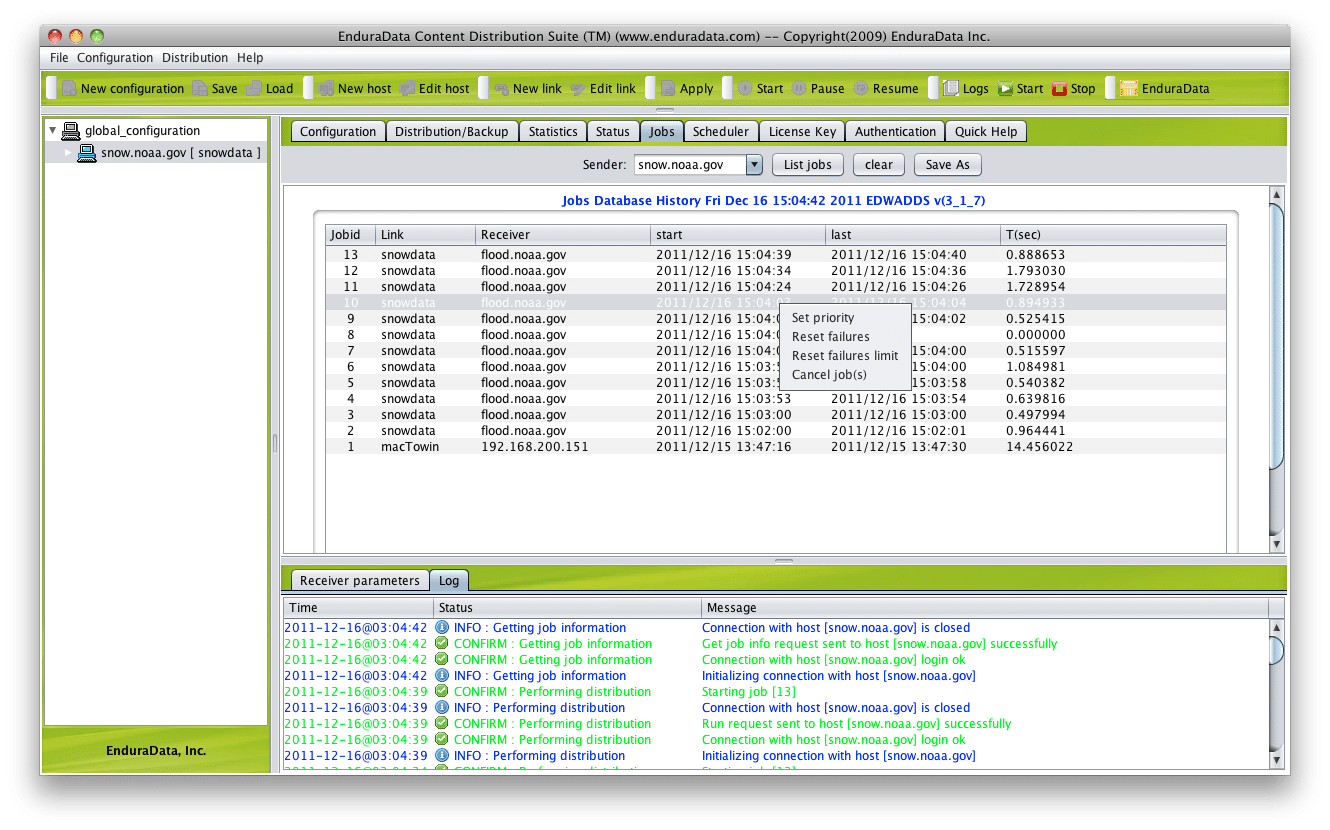
Figure 12: File synchronization and Replication Job status and management.
The file sync job status panel allows you to select one or more jobs and to modify their parameters. Right click on a row and select one of
the following action submenus:
- set priorities: to increase or decrease a file or directory sync job's priority
- reset failures: By resetting a job's failures, you can give it the same chance to move in the queue as the rest of the jobs.
- reset failure limit: A failure limit determines when the system gives up trying to send data, raising this limit will make the system try to send data more, reducing it makes the system give up trying after the specified failure limit
Combining the priorities and failure limits gives you a great way to manage your transfers during peak times and during network outages if any.
- Cancel a file sync job: This will remove a job from the queue
13. Creating a replication schedule
Figure 13 lists the steps required to create a data distribution schedule that will automate synchronization.
Although the GUI supports only three operations: Pause, Resume and Distribute, users can use this scheduler to automate other tasks.
Follow these steps to create a schedule:
- Select the type of operation from one of distribute, pause or resume.
distribute: Allows you to distribute, backup, transfer data
pause: Allows you to pause replication
resume: Allows you to resume replication if paused
- Select the link name you want to use
- Select the sender
- Select the receiver
- Select the minute when you want replication to start
- Select the hour when you want replication to start
- Select the day of the month when you want replication to start
- Select the month of the year when you want replication to start
- Select the day of the week of the year when you want replication to start
For all of these parameters, every means that the activity will occur for every possible value of that parameter.
Example: Every hour of the day
- Select the path you want to replicate
- Click "create" . This will create an entry in the schedule table. You can resize this table as you wish
- To create a new entry in the schedule table, simply change one or more parameters and click "create"
- Once you are happy with your schedule, you will need to select the sender to which you want to apply it.
The schedule is applied to the sender only except if a host is both a sender and a receiver.
- Click Apply
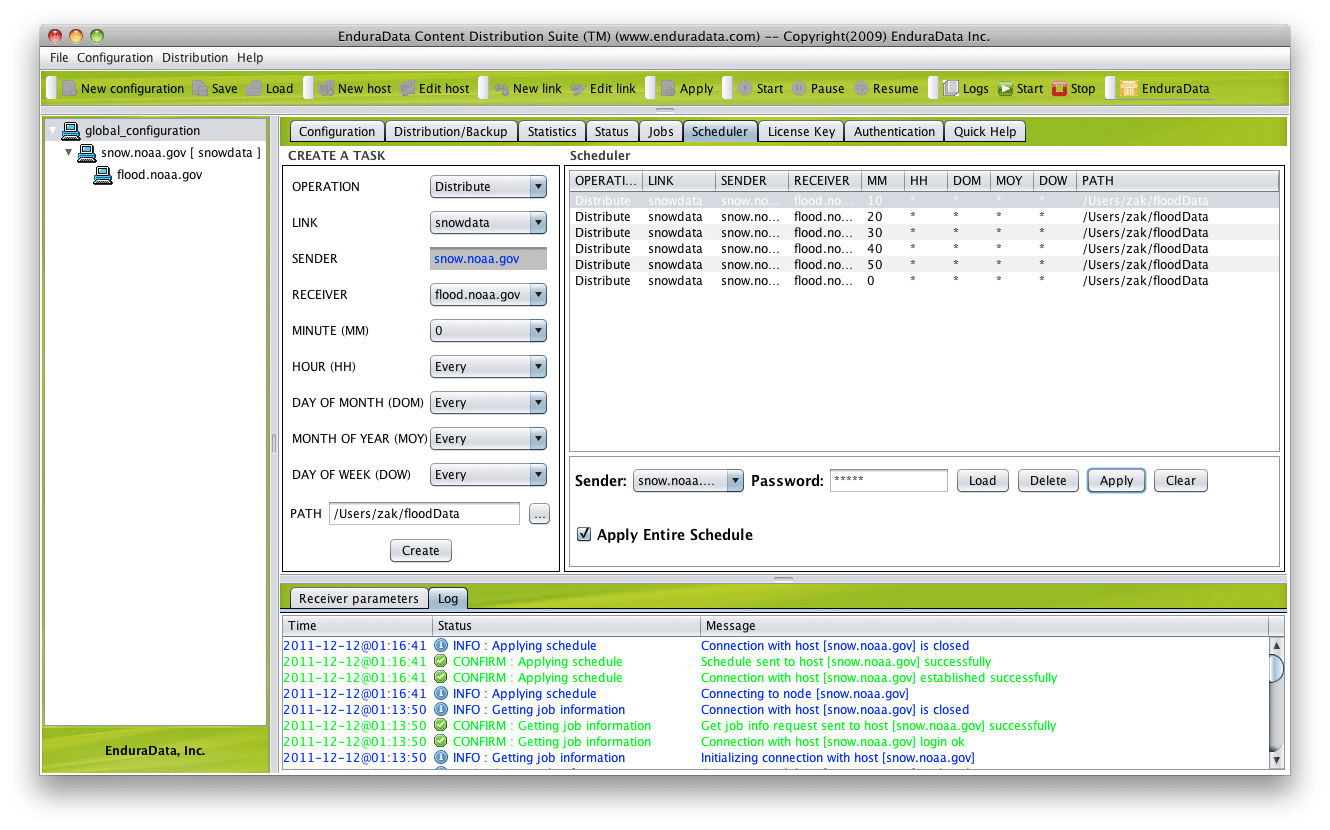
Figure 13: Automated replication scheduler
14. Quick help
Quick help menu gives you access to the online html documentation. Unix users also have access to the
traditional man pages.
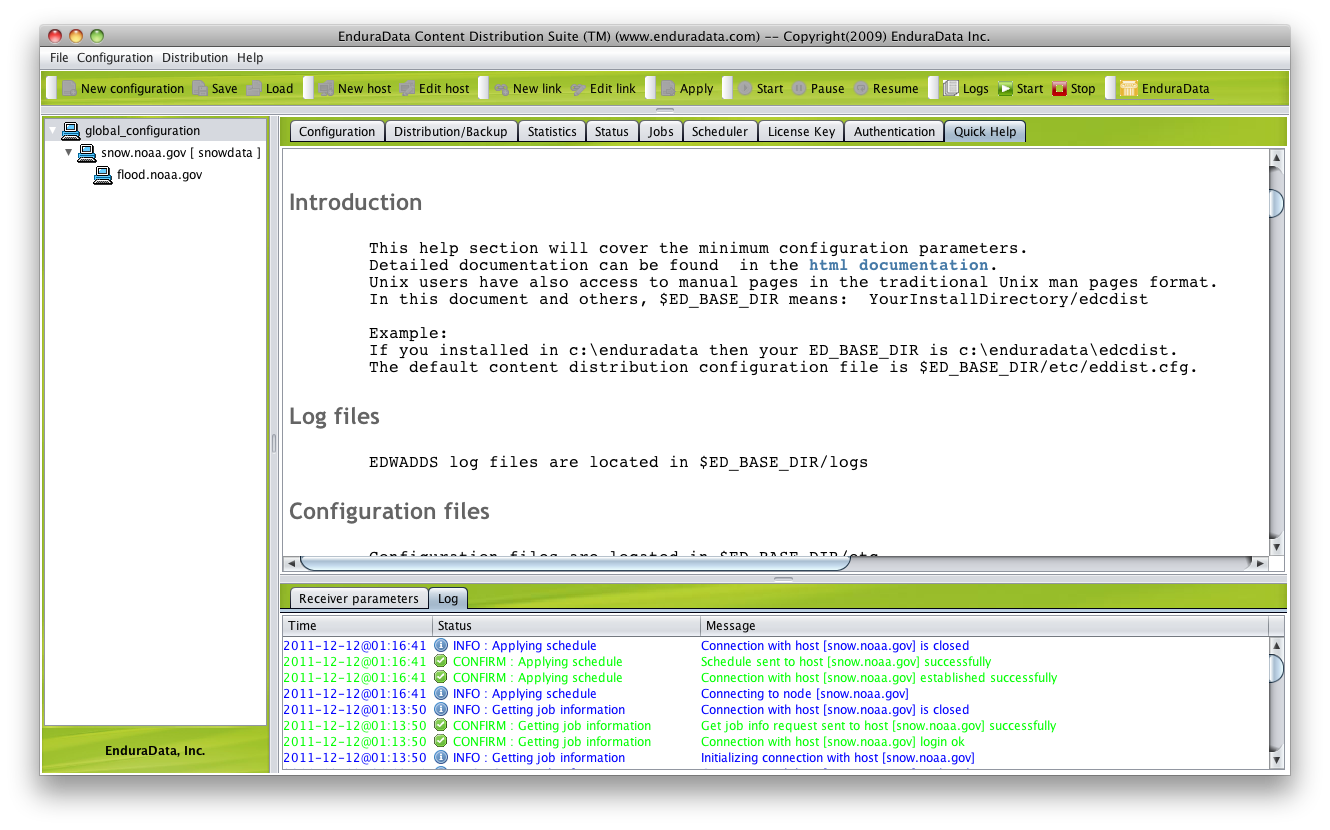
Figure 14: EDpCloud manual and help
15. Examples of other data replication configurations that you can create with EDpCloud
You can follow the same steps we did in the previous examples to create many to one, one to many as shown
in figures 15 and 16. Figure 15 shows an example of a configuration where a mac distributes data automatically to Ubuntu, Windows7, Windows XP and Solaris. Figure 16 illustrates how many remote sites such as Chicago, London, etc. automatically
aggregate and synchronize their content with a central location in Madrid. The configurations shown were created by adding new hosts and creating a new link as many times as needed.
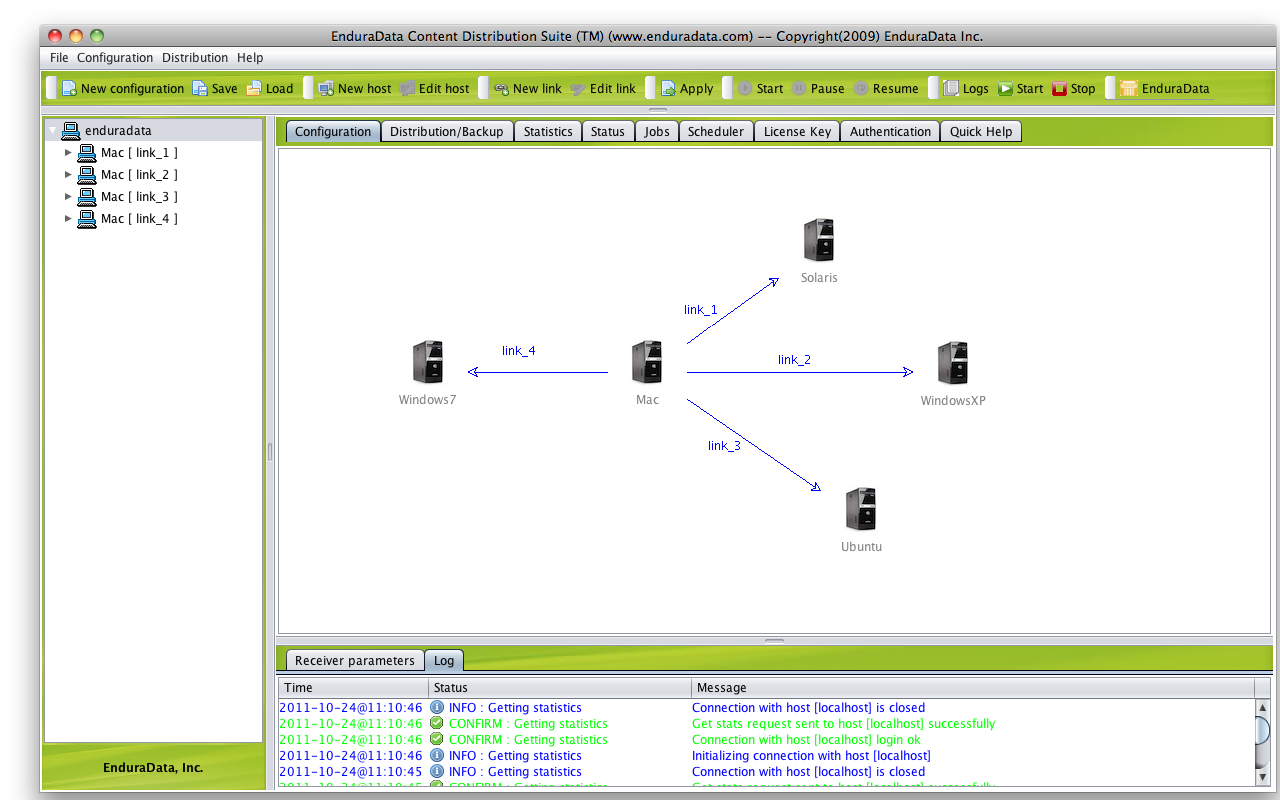
Figure 15: One to many data distribution.
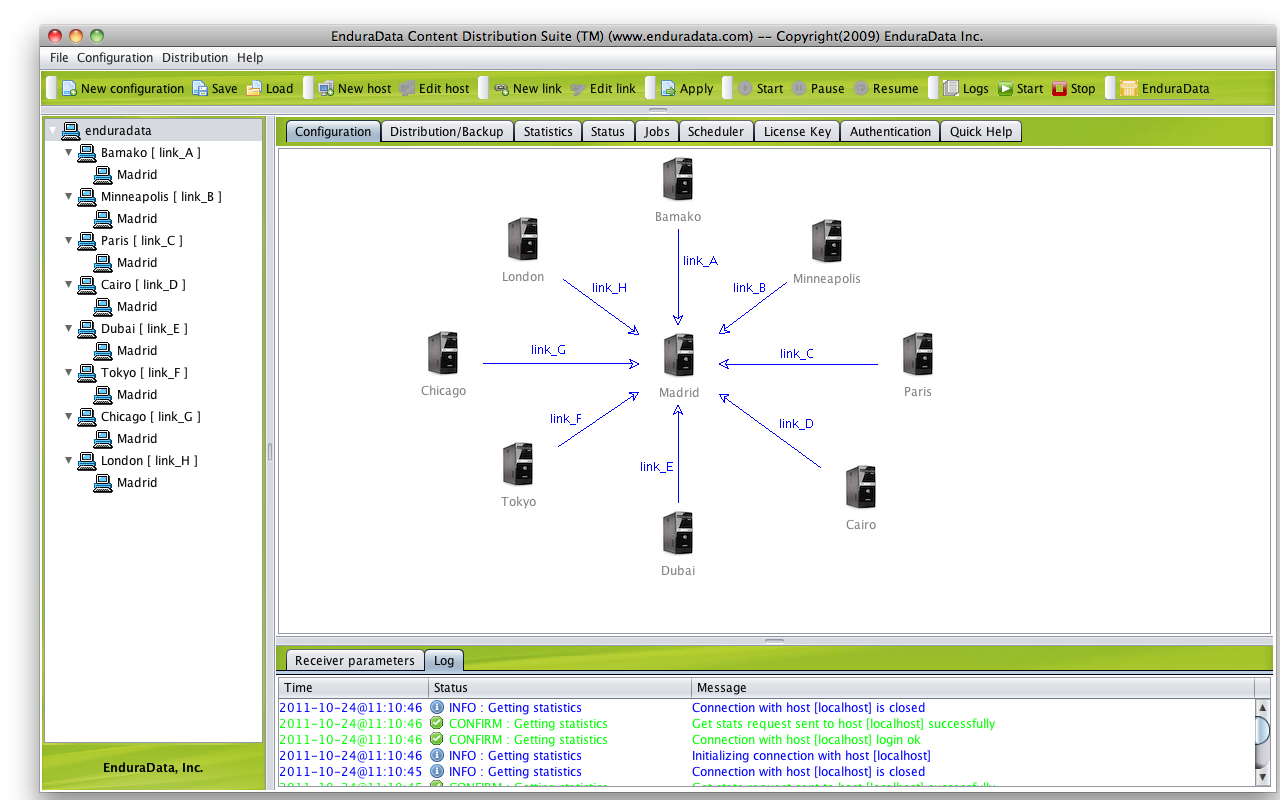
Figure 16: Many to one data replication.
16. Troubleshooting EnduraData Managed File Transfer and replication
If you run into any problems chances are that you have one of the following problems:
1. You do not have a valid license. Make sure that the license file is valid.
2. You do not have permissions on the system. Check enduradata logs to validate this.
3. The hosts you have selected may not be reachable for one of the following reasons:
- A firewall is preventing access. Check your firewall logs and make sure that the firewall is not blocking the ports used.
- The hostnames used cannot be resolved. Use ping to verify that the hosts are reachable
- The reverse lookup of your hosts failed, check your DNS and networking
- The passwords do not match
- The authorized hostname or IP does not match
The logs directory under basedir has information that tells you what's wrong. Please see the Quick guide for the correct syntax if you intend to use the command line interface for management.
4. The XML configuration file in basedir was edited manually and has syntax errors.
We have reviewed some simple file replication and data distribution configuration techniques. Advanced users can take advantage of
many other possible configurations by reading the man pages or the html that accompany the software.
For more information visit https://www.enduradata.com